OpenStack - Centos Lab1 : Keystone – Kilo
Centos Lab1 : Keystone – Kilo
In this lab you will install the prerequisites support services for OpenStack installation on your AIO node
- ntp – Network Time Protocol. This is important in order to ensure that log file time stamps can be compared across machines, and is important for services like SWIFT that rely on accurate time between machines to determine “most recent” file updates.
- MariaDB – This is the database behind all of the “live” configuration of the OpenStack environment. Other databases are supported (most notably PostgreSQL), but MariaDB or MySQL (effectively equivalent in all but name) are the most commonly deployed for this purpose.
- OpenStack Repository configuration – The pointers to the OpenStack packages are not part of the default operating system file repositories (in the RedHat ecosystem at least). We will add them to ensure our ability to install from pre-packaged code.
- Messaging queue server – Another core piece of infrastructure that’s needed to enable scaleable inter-service sub-component communication. We’ll install RabbitMQ Server, one of many options, but again, the most commonly deployed message queue for OpenStack deployments.
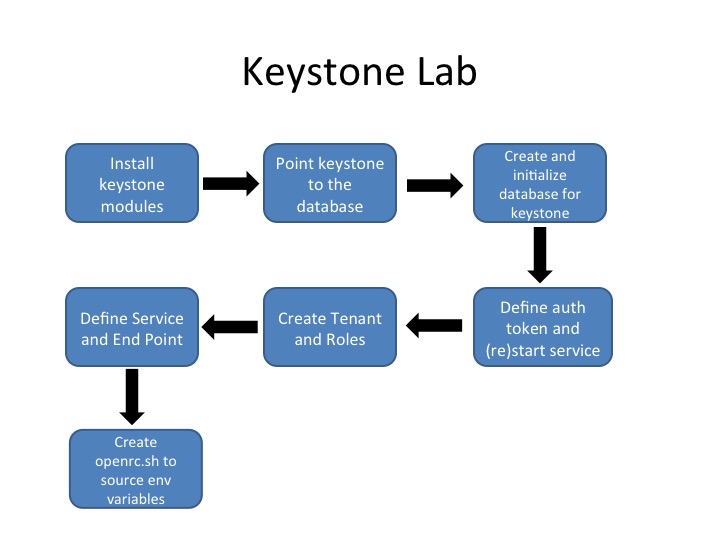
Then you will continue on to configure and verify the installation of Keystone:
 http://onecloudclass.com/wp-content/uploads/2015/03/Keystone-100x75.jpg 100w, http://onecloudclass.com/wp-content/uploads/2015/03/Keystone.jpg 720w" sizes="(max-width: 720px) 100vw, 720px" style="box-sizing: border-box; max-width: 100%; height: auto; vertical-align: middle; display: block; margin: 0px auto 1.313em;">
Basic Configuration
Check the Network settings of AIO node
Step 1: If you have not already, you will need to SSH to the control node (AIO node) and login as “centos”
ssh centos@aio151
You should not need a password, but if one is requested, use centos as the password.
Then enter the following command, that allows you to become the root user (in the root home directory, which is important for many commands to operator properly). If a password is requested, use centos as the sudo password.
sudo su -Step 2: Ensure that your host has the latest security updates:
This is just good practice, but it also ensures that network connectivity is functioning properly.
Past the following into your terminal window.
yum update -yOpenStack Prerequisites – NTP Configuration
Step 3: Install NTP with the below command:
yum install ntp -yIn the lab we have an NTP server running on “gw.onecloud” (our default gateway) which will be providing a reference clock for the nodes. First we’ll synchronize the local system clock with the NTP server, which may take 15-20 seconds as the service tries to account for any network latency (it’s trying to be accurate).
ntpdate gw.onecloudExample output:
24 Aug 22:17:36 ntpdate[1163]: adjust time server 10.1.64.1 offset 0.000462 secNext we’ll replace the contents of the /etc/ntp.conf file so that we point to our local ntp server (the defaults work as well, but this is “better internet citizenship”). We’re going to do this with a “Here File”, which in this case will copy the contents of our text into the file without having to edit it. There are very few lines needed, so this is efficient for a simple configuration like this.
cat > /etc/ntp.conf <<EOF
driftfile /var/lib/ntp/drift
restrict default nomodify notrap nopeer noquery
restrict 127.0.0.1
restrict ::1
server gw.onecloud
EOF
Here, we’re limiting our server’s reach as we’re not looking to share time information beyond our local machine. And we’re going to synchronize with our default gateway, which also provides a local NTP service we can query.
Next enable and restart the NTP service:
systemctl enable ntpd.serviceThis will enable the service by creating a link to the startup service, for example:
ln -s '/usr/lib/systemd/system/ntpd.service' '/etc/systemd/system/multi-user.target.wants/ntpd.service'systemctl start ntpd.service
systemctl status ntpd.serviceNow let’s ensure we’re actually getting updates. We can use the ntpq (NTP query) app to check with our upstream ntp server. We will see updates every “poll” seconds, when tells you when the peer was last heard from, and delay and offset tell you how far from the NTP server you are, and what the calculated offset to the local clock is. The fact that we’re receiving updates is adequate for our needs.
ntpq -pExample output:
remote           refid      st t when poll reach   delay   offset  jitter
==============================================================================
gw.onecloud     91.189.94.4      3 u   55   64    1    1.159   14.705   0.000
Step 4:OpenStack repository installation
To enable the OpenStack repository, install the epel-release package and rdo-release-kilopackage. The EPEL repository provides a set of additional tools that are used as part of the OpenStack deployment but are not a part of the baseline CentOS/RHEL repository, while the RDO repository is the result of the RedHat community packaging of the OpenStack services components. We’ll install the EPEL tools repository, and then the RDO project kilo specific repository:
yum install epel-release -yOn RHEL and CentOS, SELinux is enabled by default, and there is now an OpenStack specific set of SELinux profiles and while we’ll install them, just to ensure that we’re not going to run into SELinux specific installation or configuration issues, we’ll also disable the SELinux policies for this class. It should be possible to install properly without “setenforce 0”, but to avoid any latest code issues, we’ll still disable selinux for now.
Install the SELinux OpenStack profiles:
yum install openstack-selinux -yAnd then set SELinux to permissive mode:
setenforce 0Next we’ll install the OpenStack Utilities package. This includes a few tools that we can use to make our lives easier, specifically:
“openstack-config”: A tool for managing the ‘ini’ style configuration files used for most OpenStack services. This lab will modify the files directly, but we can simplify that process by using this tool (it’s actually based on another tool called “crud-ini”)
“openstack-service”: A tool for configuring a local mysql database on a per-OpenStack service basis. We’ll be doing this manually in the lab in order to be more clear as to what we’re doing.
“openstack-service”: A tool to determine the state of individual OpenStack services, especially given that their actual “Linux service” names may differ from what we’d otherwise expect.
“openstack-status”: A tool to get an overview of the current state of OpenStack services on a machine.
yum install openstack-utils -yInstall MariaDB
Step 5: All OpenStack services require a database to store backing information such as what networks have been created, or what VMs are running and their state. While a number of databases could be used to store this information (including the “file based” model of something like SQLite), we’ll use the most common one deployed today for this purpose in the OpenStack community: MySQL. Or rather, we would but the CentOS/Fedora/RedHat community has decided that the preferred solution is actually MariaDB, which is a fork of the MySQL code. For our purposes (and most purposes that we are aware of), the MySQL === MariaDB. In fact, the configuration files can be identical, the tools with which applications and users consume the data is identical, but in CentOS 7, it’s easier to install MariaDB than MySQL, so that’s what we’ll do.
We’re also going to configure a database in the database… MariaDB is really an application that allows you to support multiple separate databases (and their underlying tables, and relationships) in the same database “engine”, and that’s what we’ll be doing in this case. So we’ll set up the Keystone database and an access user (with the appropriate rights and permissions) as one of the many that will reside in one über MariaDB process.
yum install mariadb mariadb-server MySQL-python -yStep 6: Ensure that MariaDB is accessible from any interface on the local host.
While we could open access to the entire local network, or even to anyone, we want to ensure that if a connection request is directed at one of the public host interfaces (e.g. a client tries to connect to the IP address mapped from the /etc/hosts file), that this will work. By default, MariaDB will only accept connections targeted at “localhost” or the 127.0.0.1 address. In order to remedy this, we’ll edit the MariaDB configuration file at /etc/my.cnf and add the bind-address parameter pointing to the AIO node hostname, this will enable local connectivity on both the localhost and hostname addresses. First we’ll open the file in the vi editor (emacs and nano editors are also available):
vi /etc/my.cnfWe are looking for the “[mysqld]” section (remember this is a fork of the MySQL project), and will want to add the bind-address parameter immediately following that section, which is actually likely the first section in the file.
In vi we can use the “/” command to start a forward search (this will be more useful in future edits), and follow that with the section we’re looking for: “[mysqld]”
Once we’ve found that section we can insert after the line we’re on (we found it after all) first by hitting the <enter> key, and then by running the “o” command (Note: that’s lowercase O), which will insert after the current line. We can then paste or type the following:
bind-address = aio151But wait! We’re not done yet, there’s more that we’ll want to configure in MariaDB, and we can add them to this same section. Specifically, we want to select the engine that actually writes data to disk, and tweak the way characters are handled in the communications between the OpenStack components and the database:
default-storage-engine = innodb
innodb_file_per_table = 1
collation-server = utf8_general_ci
init-connect = 'SET NAMES utf8'
character-set-server = utf8
Our file should now look like:
[mysqld]
bind-address = aio151

default-storage-engine = innodb
innodb_file_per_table = 1
collation-server = utf8_general_ci
init-connect = 'SET NAMES utf8'
character-set-server = utf8

datadir=/var/lib/mysql
socket=/var/lib/mysql/mysql.sock
# Disabling symbolic-links is recommended to prevent assorted security risks
.
. {there's more file here, but we've omitted it for brevity}
.
Now that we’ve gotten all that inserted, go ahead and hit the <esc> key to get out of insertion mode, and the we’ll “write and quit”: with “:wq”<enter>
Step 7: Enable and start the MariaDB service to apply the changes.
Since we’ve modified the configuration, we’ll need to restart the service, or in this case, since we’ve just installed it, start the service. We’ll use the newer ‘systemctl’ command set to modify the MariaDB service state. We’ll also ensure that the service is set to auto-start as we’ve not done that yet. Most current systems packages install the service but don’t enable it or start it (at least in the RedHat world).
systemctl enable mariadb.service
systemctl start mariadb.service
systemctl status mariadb.service
Now you will run “mysql_secure_installation,” a script to improve the security of your database installation like removing anonymous accounts and control access to root accounts.
The defaults for the rest of the questions (about root access, demo databases, etc.) are appropriate and you can simply press <enter> to all of the questions until you get back to the command prompt.
mysql_secure_installationAt this point, we have MariaDB installed and ready to have databases added to it in order to support the OpenStack services. One more infrastructure component, and then we can get on to deploying our first component of the OpenStack system.
Install Message Queue Sever
Step 8: OpenStack uses a message queue service to coordinate operations and status information among services. OpenStack as a community has decided to principally leverage an AMQP based message service, and we will install one for our environment to leverage. As with the underlying database service, there are a number of AMQP based services available, and the OpenStack community has converged on the RabbitMQ version (as opposed to the similar Apache Qpid or even the commercial ActiveMQ solution). We won’t diverge from the community here either, and will install the packaged RabbitMQ server.
Execute the following command to install the rabbitmq-server package:
yum install rabbitmq-server -yAs with MariaDB, while we now have the package installed, it is not yet running, and a re-boot would not currently trigger a startup of the process, which is something we’ll want. The following commands will enable the service across reboots, and then start the service.
systemctl enable rabbitmq-server.service
systemctl start rabbitmq-server.service
systemctl status rabbitmq-server.service
One will perhaps note that we didn’t modify any configuration files in this scenario, but much like MariaDB, we’ll still want to at least properly configure a password for the default user of the RabbitMQ server. Note that most configuration of the system is actually done by talking to the server, rather than modifying configuration files, and more often than not, the configuration is actually done by an application talking to the server itself rather than a human interfering with the process.
Step 9: Change the default guest password of RabbitMQ to pass
The default installation of RabbitMQ has a default account guest. We’ll assign a password ofpass the the guest account.
rabbitmqctl change_password guest pass
systemctl restart rabbitmq-server.service
While not necessary for OpenStack function, it is sometimes useful to have access to the RabbitMQ management web interface. We can install it with the following:
rabbitmq-plugins enable rabbitmq_management
After which we’ll once again need to restart rabbit:
systemctl restart rabbitmq-server.service
At this point, the RabbitMQ web interface is running on port 15672. In our lab environment, the easiest way to get access to this interface is to establish a new port forward from our local ssh client by adding:
-L 15672:aio151:15672to our ssh connect string. We would now have something like:
ssh user17@labs.onecloudinc.com -L 8080:aio151:80 -L 6080:aio151:6080 -L 15672:aio151:15672Opening a browser on your laptop and pointing to http://localhost:15672 should present a login page, and you can login with user: guest, password:pass
Note that there will not be much to look at yet, as this system is just running with the management queue, but keeping an eye on this page as services are enabled will give you a view into the new queues that are created as services are deployed within OpenStack.
Install OpenStack Identity Service – Keystone
Step 10: Installing the OpenStack identity service:
Log into the aio node, and become root if you haven’t already done so (if you followed the last set of steps to add a new port forward for rabbit, you should be on the lab-gateway but not on your aio node):
ssh centos@aio151
sudo su -
Now install the openstack-keystone package, and the python CLI packages. This installs the server and a set of CLI tools that we’ll use to configure and manage the keystone service.
yum install openstack-keystone python-openstackclient -yStep 11: Configure the keystone service database connection information.
The Identity Service uses databases to store information such as users, passwords, policy, an endpoint service catalog and authentication tokens. Over the next few steps, we’ll:
Update the service configuration to allow the keystone service to know how to communicate with the database.
Add a “static” token to allow for the keystone service to bootstrap user authentication.
Configure the token model (a choice between UUID we’re using and a PKI signed token that you’d use for production)
Configure the token storage method.
The static token (admin_token) is a parameter that will allow us to talk to the keystone service in advance of keystone knowing about any particular user or backend for user authentication. This bootstrap token can be removed once the initial bootstrap processing has been completed. We’ll be using the super secure “ADMIN_TOKEN” token.
Our configuration will edit the /etc/keystone/keystone.conf file:
vi /etc/keystone/keystone.confFind the [DEFAULT] section as we did before with the MariaDB [mysqld] section and change the admin_token parameter to ADMIN_TOKEN (the / character goes into search mode, start typing your search term, case maters!, and hit the <enter> key to stop):
admin_token=ADMIN_TOKEN
| admin_token=ADMIN_TOKENis not the same as:
|admin_token=ADMIN_TOKENWe bring this up because often there are pre-defined “default” values that match what we’re instructing you to insert in the file, and just removing the comment character (the # at the beginning of the line) will often leave a little white space in front of the parameter name. This is bad, and should be avoided.
Now find the [database] section and add the mysql connection string right after the section header.
connection=mysql://keystone:pass@aio151/keystone Next we configure the token management model and backends.
In the [revoke] section, configure the SQL revocation driver:
driver = keystone.contrib.revoke.backends.sql.Revoke
In the [token] section and the UUID token provider and SQL parameters:
provider=keystone.token.providers.uuid.Provider
driver=keystone.token.persistence.backends.sql.Token
Now that we’ve gotten all that inserted, go ahead and hit the <esc> key to get out of insertion mode, and the we’ll “write and quit” with “:wq”<enter>
So we now have the configuration we need, but if we start the Keystone service now, it will not work, because we haven’t created the database (or the database credentials) to allow Keystone to store its information! We’ll do that next.
Create the Keystone Database
Step 12: Log in to MariaDB using the mysql command line client
We’ll first create the database by logging into MariaDB and creating the database, and creating the user and the user’s privileges. This will let the “connection” parameters that we set in the keystone.conf file function properly.
mysql -uroot -ppass
CREATE DATABASE keystone;
GRANT ALL PRIVILEGES ON keystone.* TO 'keystone'@'localhost' IDENTIFIED BY 'pass';
GRANT ALL PRIVILEGES ON keystone.* TO 'keystone'@'%' IDENTIFIED BY 'pass';
exit
The above will log you in and out of the database service. You can run the mysql -uroot -ppass command again, and once at the MariaDB> prompt, you can execute the command show databases; to see the newly created, but empty, keystone database. How do we know it’s empty? We haven’t put anything in it yet for one thing, but we can check that too, with the use keystone; command to select the keystone database from the MariaDB prompt, and then show tables; will will return an empty set, because we’ve not created any yet.
Step 13: Create the Keystone database tables
While we could create the database tables (and their individual row definitions) one line at a time in the same general fashion as we did with the database creation process in the previous step, there’s a better way. The OpenStack community has created a set of tools (one for each service at the moment) specifically designed to synchronize the database to the “current” specification. In reality, this is an important tool for the process of upgrading from one version of OpenStack to another, and we’re using it in the “migrate from nothing to something” mode. Note also that we’re running this command as the service user for this project (where did that come from? it was created as a part of the package installation). This does at least validate that our connection string works properly as we are in this case “acting” as the keystone user.
su -s /bin/sh -c "keystone-manage db_sync" keystoneNote: Now that we’ve actually created something in the keystone database we can see the created tables, and what if any content exists.
1) Log in to MariaDB: mysql -uroot -ppass
2) Select the keystone database: use keystone;
3) Display the list of tables: show tables;
4) We can see what’s in a table with: select * from {table}, as in select * from domain
Step 14: Restart Keystone:
As with the other services, we need to both enable and start (for the first time) the keystone service.
restart instead of start.systemctl enable openstack-keystone.service
systemctl start openstack-keystone.service
systemctl status openstack-keystone.serviceDefine Keystone Resources
Now that Keystone is installed, we need to insert the users, roles, services and tenants. We will also install our first service endpoint, building the basic model for Keystone’s interaction with all of the other OpenStack projects and the services they provide.
We will start by configuring the bootstrap access “Endpoint”, which is the common synonym for the RESTful API URI that we will communicate with to configure the service model in Keystone. We won’t talk to the endpoint directly, instead, we’ll leverage the Keystone CLI client, which will take our higher order requests, and build the correct JSON objects needed to actually implement our requirements.
With the endpoint in place, and leveraging the token that we installed into the Keystone configuration, we’ll then insert a set of users (over the course of the lab, at least one user per service plus an administrative user), a set of services (effectively tags used to map a user to a set of capabilities), and a set of roles (the policies of what functions on a service by service basis are available). Users also map to the tenant(s) that we will create, and the intersection of user/role(mapped per service)/tenant defines whether a particular request will complete or be rejected.
So we’ll create a user, and give the user a password.
We’ll create a tenant, and assign the user to the tenant.
We’ll create a role, and associate the role with the user.
All of this will occur under the “authorization” of our ADMIN_TOKEN. Once we establish our admin user credentials, we can drop the ADMIN_TOKEN, and generate one in the normal fashion.
Step 15: Establish the ADMIN_TOKEN and Keystone Endpoint
So let’s tell the system (or more specifically the keystone python CLI client) what our admin_token is, and where it can find the Keystone server API (it’s RESTful endpoint).
export OS_TOKEN=ADMIN_TOKENexport OS_URL=http://aio151:35357/v2.0Now we’ll create two tenants, one for administrative users and a second to associate OpenStack service accounts with (accounts for internal programatic use like nova asking neutron for a port). We’ll add the admin user to both tenants as the admin user is effectively also the keystone service user.
First the admin tenant:
openstack project create --description "Admin Project" adminExample output:
+-------------+----------------------------------+
|   Property  |              Value               |
+-------------+----------------------------------+
| description |           Admin Project          |
|   enabled   |               True               |
|      id     | 4dadf7a504ae4ef0aefe90cdbbc0df22 |
|     name    |              admin               |
+-------------+----------------------------------+Then the service tenant:
openstack project create --description "Service Project" serviceNext we’ll create our first user, the admin user, and associate the user with the admin tenant. We will assign a password for the user at the same time (our normal super secret “pass” password):
openstack user create admin --password pass --email Dit e-mailadres wordt beveiligd tegen spambots. JavaScript dient ingeschakeld te zijn om het te bekijken.Example output:
+----------+----------------------------------+
| Property | Value |
+----------+----------------------------------+
| email | Dit e-mailadres wordt beveiligd tegen spambots. JavaScript dient ingeschakeld te zijn om het te bekijken. |
| enabled | True |
| id | 8375ae0e1b854caaa328021629bacaba |
| name | admin |
| username | admin |
+----------+----------------------------------+Create a role for administrative tasks called admin. Any roles you create should map to roles specified in the policy.json files of the various OpenStack services. For example, policy.json file can be seen under each services like /etc/keystone/policy.json. The default policy files use the admin role to allow access to most services.
openstack role create adminA user can have multiple roles, and even different sets of roles on a tenant by tenant basis. So the association of a role to a user requires the tenant that the user:role association is made under.
admin role has special meaning in the default policy.json files, while the admin tenant name doesn’t have any specific special privilege. We’ve created the tenant admin more out of convention than requirement, while the assignment of the role admin is very specifically mapped to very specific functions (being approximately of the same nature of the “root” or “Administrator” roles in *nix or Windows respectively)We’ll now add the admin user, as a member of the admin tenant, to the admin role. This step creates all three associations, the user admin is now associated with the admin tenant, and the user admin has the role of admin in the tenant called admin. So even though we’ve assigned this role to the admin user, if we added the user to the admin tenant without also adding the admin role, the admin user would only have the default ‘_member_’ role (one that we don’t have to create as it is truly a default, but also needs to exist in the different services policy.json files just the same).
openstack role add --user admin --project admin adminThere is no output from this command, so let’s just see if there’s an association now:
openstack role list --user admin --project adminExample output:
+-----...-----+-------+-------------+----------+
|    id       |  name |   Project    |  User  |
+----------------------------------+-----------+
| 7790...b341 | admin |   admin      |  admin |
+-----...-----+-------+---------------------+
While the user and tenant id’s aren’t presented as names, we could look them up and see that in fact they match to the admin user and tenant user, but specifically, this query was about roles, and in this case, the user has a specific role: admin, which was our initial query.
Define services and service endpoints
One of Keystone’s roles in the OpenStack environment is to provide an endpoint for user authentication, and you’ve now implemented a single example of user management. Service can be seen as the equivalent to Tenant in terms of providing a central aggregate on which to map resource consumption. The endpoint is what you get when you’ve looked for ‘compute’ as service, and the system responds with a Nova Compute endpoint. In our case, we’ll create the ‘identity’ service so that we can map Keystone as the endpoint to the ‘identity’ service.
Over the next few steps, we’ll:
a) create a service “name” (it’s just a pointer to spe cific systems)
b) create an endpoint that can be discovered based on the service name
Step 16: Create a keystone/’identity’ service
In this case, name is that, the name of the endpoint we want to look up at some point, where identity is the “well know service identifier” that all of the clients and API tools expect to be able to request. The service/endpoint mapping is actually made by ids, not names, but we still define the name in addition to the more user friendly description.
openstack service create --name keystone --description "OpenStack Identity" identity+-------------+----------------------------------+
| Property | Value |
+-------------+----------------------------------+
| description | Openstack Identity |
| enabled | True |
| id | 3827c4bcc64d46af821341d7593dcf16 |
| name | keystone |
| type | identity |
+-------------+----------------------------------+Next, we’ll specify the endpoint location for our identity service, and we’ll at the same time, add the identity service id to associate the two together. When you specify an endpoint, you provide URLs for the public API, internal API, and admin API where each of these URLs can expose differing subset of the APIs. In current OpenStack, these endpoints are all effectively the same, but the flexibility is there for future use. This also supports the concept of an API interface that may have different security when compared to the internal address. In our case, we’re going to use the same IP address as the “listening” address, effectively mapping all of our endpoints together. In a production system, you’d most likely have different interfaces mapped to different endpoint paths.
openstack endpoint create --publicurl http://aio151:5000/v2.0 --internalurl http://aio151:5000/v2.0 --adminurl http://aio151:35357/v2.0 --region RegionOne identityExample output:
+-------------+----------------------------------+
|   Property  |              Value               |
+-------------+----------------------------------+
|   adminurl  |     http://aio151:35357/v2.0     |
|      id     | ef46e36c4e3140de8580873afab50262 |
| internalurl |     http://aio151:5000/v2.0      |
|  publicurl  |     http://aio151:5000/v2.0      |
|    region   |            regionOne             |
|  service_id | 3827c4bcc64d46af821341d7593dcf16 |
|service_name | keystone                         |
|service_type | identity                         |
+-------------+----------------------------------+
Verify the Keystone installation
Step 17: First we unset the OS_SERVICE_TOKEN and OS_SERVICE_ENDPOINT environment variables as these parameters were only used to bootstrap the administrative user and register the Identity Service.
unset OS_SERVICE_TOKEN OS_SERVICE_ENDPOINTYou can now use regular username-based authentication, instead of the fixed and insecure tokens. We can verify that we can in fact authenticate by passing the required parameters on the command line as in:
openstack --os-auth-url http://aio151:35357 --os-project-name admin --os-username admin --os-auth-type password token issueThe response:
+-----------+----------------------------------+
|  Property |              Value               |
+-----------+----------------------------------+
|  expires  |       2015-05-06T12:38:33Z       |
|     id    | 75450dfdc0b54393a805ed9f344d049f |
|project_id | a5e8b63a417641d69ee18ed43c86c728 |
|  user_id  | 8375ae0e1b854caaa328021629bacaba |
+-----------+----------------------------------+
You should receive a token in response (we configure d UUID based tokens, and the ‘id’ field above _is_ the token), paired with your user ID. This verifies that keystone is running on the expected endpoint, and that your user account is established with the expected credentials.
Next, verify that authorization is behaving as expected by requesting authorization on a tenant.
openstack --os-auth-url http://aio151:35357 --os-project-name admin --os-username admin --os-auth-type password project listYou should receive a new token, this time including the ID of the tenant you specified (a different id as we are now requesting more specific credentials, and maybe different capabilities based on an associated role). This verifies that your user account is associated with the specified tenant, and that the tenant exists as expected.
Step 18: Create an openrc.sh script to simplify tool commands
Adding –os-username etc. to each CLI command can quickly become cumbersome, so of course there are some shortcuts. Specifically, we want to set environment variables with these capabilities rather than having to add them to the command line all the time. We’ve actually already done this with the admin_token and the service_endpoint commands, but we’ll now create a script so that we can re-set these parameters any time we need to (e.g. at the beginning of every lab session going forward).
The simples way to configure this is with a “HERE script” much like we did at the beginning of this session with our ntp.conf configuration:
cat > ~/openrc.sh <<EOF
export OS_USERNAME=admin
export OS_PASSWORD=pass
export OS_TENANT_NAME=admin
export OS_AUTH_URL=http://aio151:35357/v2.0
export OS_AUTH_TYPE=password
EOF
Step 19: You can source this file to read in the environment variables.
source ~/openrc.shsudo su - step), we’ll want to run the same source ~/openrc.sh command as well.Now we can verify that our credentials are still correct in our newly created file by performing the same command as above, but without the –os-* arguments. Note that we’ve set a tenant in the script as well, so we’ll get a tenant scoped token in response (tenant_id in the output):
openstack token issueThis command returns a token and the ID of the specified tenant as before:
+-----------+----------------------------------+
|  Property |              Value               |
+-----------+----------------------------------+
|  expires  |       2015-05-06T19:46:31Z       |
|     id    | c4440c0d81b3440faeb064256cd53db1 |
| project_id| 4dadf7a504ae4ef0aefe90cdbbc0df22 |
|  user_id  | 8375ae0e1b854caaa328021629bacaba |
+-----------+----------------------------------+
This verifies that you have configured your environment variables correctly. Finally, you we can verify that we have the admin role associated with the admin tenant and our admin user by verifying that we can list our users (an admin capabilities):
openstack user listExample output:
+------------------------------------------+
|                id                |  name |
+----------------------------------+-------+
| 8375ae0e1b854caaa328021629bacaba | admin |
+----------------------------------+-------+
We have now verified that your user account has the admin role, which matches the role used in the Keystone policy.json file.
If time permits, review the lab to get a reminder of what you have accomplished.
In the next Lab, you’ll continue to build core functionality of your cloud system with a virtual disc image management system: Glance.