ESP8266 First Web Server
The actual implementation of a web server is much easier than it sounds, because the ESP8266 Arduino Core includes some great libraries that handle pretty much everything for you. Let's look at a basic Hello World! example.
#include <ESP8266WiFi.h>
#include <WiFiClient.h>
#include <ESP8266WiFiMulti.h>
#include <ESP8266mDNS.h>
#include <ESP8266WebServer.h>   // Include the WebServer library

ESP8266WiFiMulti wifiMulti;     // Create an instance of the ESP8266WiFiMulti class, called 'wifiMulti'

ESP8266WebServer server(80);    // Create a webserver object that listens for HTTP request on port 80

void handleRoot();              // function prototypes for HTTP handlers
void handleNotFound();

void setup(void){
  Serial.begin(115200);         // Start the Serial communication to send messages to the computer
  delay(10);
  Serial.println('\n');

  wifiMulti.addAP("ssid_from_AP_1", "your_password_for_AP_1");   // add Wi-Fi networks you want to connect to
  wifiMulti.addAP("ssid_from_AP_2", "your_password_for_AP_2");
  wifiMulti.addAP("ssid_from_AP_3", "your_password_for_AP_3");

  Serial.println("Connecting ...");
  int i = 0;
  while (wifiMulti.run() != WL_CONNECTED) { // Wait for the Wi-Fi to connect: scan for Wi-Fi networks, and connect to the strongest of the networks above
    delay(250);
    Serial.print('.');
  }
  Serial.println('\n');
  Serial.print("Connected to ");
  Serial.println(WiFi.SSID());              // Tell us what network we're connected to
  Serial.print("IP address:\t");
  Serial.println(WiFi.localIP());           // Send the IP address of the ESP8266 to the computer

  if (MDNS.begin("esp8266")) {              // Start the mDNS responder for esp8266.local
    Serial.println("mDNS responder started");
  } else {
    Serial.println("Error setting up MDNS responder!");
  }

  server.on("/", handleRoot);               // Call the 'handleRoot' function when a client requests URI "/"
  server.onNotFound(handleNotFound);        // When a client requests an unknown URI (i.e. something other than "/"), call function "handleNotFound"

  server.begin();                           // Actually start the server
  Serial.println("HTTP server started");
}

void loop(void){
  server.handleClient();                    // Listen for HTTP requests from clients
}

void handleRoot() {
  server.send(200, "text/plain", "Hello world!");   // Send HTTP status 200 (Ok) and send some text to the browser/client
}

void handleNotFound(){
  server.send(404, "text/plain", "404: Not found"); // Send HTTP status 404 (Not Found) when there's no handler for the URI in the request
}
There's a lot of code that's the same as in the Wi-Fi and mDNS examples.
The actual server code is pretty straightforward. First, we create a server instance that listens for HTTP requests on port 80. This is the default port for web servers. In the setup, we tell the server what to do with certain HTTP requests. If the URI '/' is requested, the server should reply with a HTTP status code of 200 (Ok) and then send a response with the words 'Hello world!'. We put the code for generating a response in a separate function, and the we tell the server to execute it when '/' is requested, using the
server.onfunction.
We haven't specified what the server should do if the client requests any URI other than '/'. It should respond with an HTTP status 404 (Not Found) and a message for the user. We put this in a function as well, and use
server.onNotFoundto tell it that it should execute it when it receives a request for a URI that wasn't specified with
server.on.
Then we start listening for HTTP requests by using
During the loop, we constantly check if a new HTTP request is received by running
server.begin.
During the loop, we constantly check if a new HTTP request is received by running
server.handleClient. If handleClient detects new requests, it will automatically execute the right functions that we specified in the setup.
To test it out, upload the sketch, open a new browser tab, and browse to http://esp8266.local. You should get a webpage saying
Hello world!. If you try to go to a different page, http://esp8266.local/test, for instance, you should get a 404 error:
404: Not found.
Turning on and off an LED over Wi-Fi
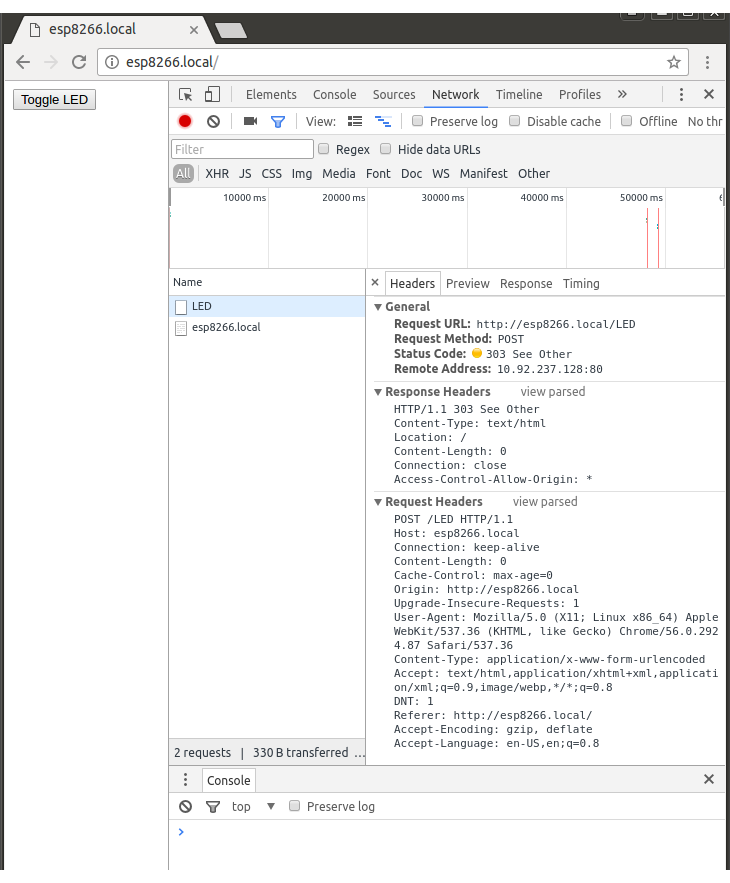
We can use the web server to serve interactive pages, and to react to certain POST request. In the following example, the ESP8266 hosts a web page with a button. When the button is pressed, the browser sends a POST request to /LED. When the ESP receives such a POST request on the /LED URI, it will turn on or off the LED, and then redirect the browser back to the home page with the button.
In order to perform this redirect, the ESP has to add a Location header to the response, and use a 303 (See Other) HTTP status code.
The button to send the POST request in the browser is part of an HTML form. You have to specify the target URI to send the request to, and the request method, in this case this is "/LED" and POST respectively.
Note that I changed the content type of the response from "text/plain" to "text/html". If you send it as plain text, the browser will display it as text instead of interpreting it as HTML and showing it as a button.
#include <ESP8266WiFi.h>
#include <WiFiClient.h>
#include <ESP8266WiFiMulti.h>
#include <ESP8266mDNS.h>
#include <ESP8266WebServer.h>

ESP8266WiFiMulti wifiMulti;     // Create an instance of the ESP8266WiFiMulti class, called 'wifiMulti'

ESP8266WebServer server(80);    // Create a webserver object that listens for HTTP request on port 80

const int led = 2;

void handleRoot();              // function prototypes for HTTP handlers
void handleLED();
void handleNotFound();

void setup(void){
  Serial.begin(115200);         // Start the Serial communication to send messages to the computer
  delay(10);
  Serial.println('\n');

  pinMode(led, OUTPUT);

  wifiMulti.addAP("ssid_from_AP_1", "your_password_for_AP_1");   // add Wi-Fi networks you want to connect to
  wifiMulti.addAP("ssid_from_AP_2", "your_password_for_AP_2");
  wifiMulti.addAP("ssid_from_AP_3", "your_password_for_AP_3");

  Serial.println("Connecting ...");
  int i = 0;
  while (wifiMulti.run() != WL_CONNECTED) { // Wait for the Wi-Fi to connect: scan for Wi-Fi networks, and connect to the strongest of the networks above
    delay(250);
    Serial.print('.');
  }
  Serial.println('\n');
  Serial.print("Connected to ");
  Serial.println(WiFi.SSID());              // Tell us what network we're connected to
  Serial.print("IP address:\t");
  Serial.println(WiFi.localIP());           // Send the IP address of the ESP8266 to the computer

  if (MDNS.begin("esp8266")) {              // Start the mDNS responder for esp8266.local
    Serial.println("mDNS responder started");
  } else {
    Serial.println("Error setting up MDNS responder!");
  }

  server.on("/", HTTP_GET, handleRoot);     // Call the 'handleRoot' function when a client requests URI "/"
  server.on("/LED", HTTP_POST, handleLED);  // Call the 'handleLED' function when a POST request is made to URI "/LED"
  server.onNotFound(handleNotFound);        // When a client requests an unknown URI (i.e. something other than "/"), call function "handleNotFound"

  server.begin();                           // Actually start the server
  Serial.println("HTTP server started");
}

void loop(void){
  server.handleClient();                    // Listen for HTTP requests from clients
}

void handleRoot() {                         // When URI / is requested, send a web page with a button to toggle the LED
  server.send(200, "text/html", "<form action=\"/LED\" method=\"POST\"><input type=\"submit\" value=\"Toggle LED\"></form>");
}

void handleLED() {                          // If a POST request is made to URI /LED
  digitalWrite(led,!digitalRead(led));      // Change the state of the LED
  server.sendHeader("Location","/");        // Add a header to respond with a new location for the browser to go to the home page again
  server.send(303);                         // Send it back to the browser with an HTTP status 303 (See Other) to redirect
}

void handleNotFound(){
  server.send(404, "text/plain", "404: Not found"); // Send HTTP status 404 (Not Found) when there's no handler for the URI in the request
}
As you can see, the
server.onfunction now takes three parameters: the URI, the request method (GET or POST) and the function to execute.
Connect an LED to GPIO2, and upload the sketch. Then go to http://esp8266.local/ and click the button to turn the LED on or off.
You can open the developer options in Chrome (F12) to check the HTTP request that are made when you click the button: you'll see that it first send a POST request, and then receives a 303 (See Other) HTTP status as a response. The response also has a Location header containing the URI "/", so the browser will send a GET request to the URI of this new location:
If you check the page source (CTRL+U), you can see the simple HTML form that's used:
<form action="/LED" method="POST">
    <input type="submit" value="Toggle LED">
</form>
Sending data to the ESP using HTTP POST
In the previous example, we sent an empty POST request to the ESP8266. In the previous chapter however, I explained that it's possible to send all kinds of data in the body of the POST request.
In this example, I'll show you how to send a username and a password to the ESP. The ESP will then check if they are correct, and respond to the request with the appropriate page.
#include <ESP8266WiFi.h>
#include <WiFiClient.h>
#include <ESP8266WiFiMulti.h>
#include <ESP8266mDNS.h>
#include <ESP8266WebServer.h>

ESP8266WiFiMulti wifiMulti;     // Create an instance of the ESP8266WiFiMulti class, called 'wifiMulti'

ESP8266WebServer server(80);    // Create a webserver object that listens for HTTP request on port 80

void handleRoot();              // function prototypes for HTTP handlers
void handleLogin();
void handleNotFound();

void setup(void){
  Serial.begin(115200);         // Start the Serial communication to send messages to the computer
  delay(10);
  Serial.println('\n');

  wifiMulti.addAP("ssid_from_AP_1", "your_password_for_AP_1");   // add Wi-Fi networks you want to connect to
  wifiMulti.addAP("ssid_from_AP_2", "your_password_for_AP_2");
  wifiMulti.addAP("ssid_from_AP_3", "your_password_for_AP_3");

  Serial.println("Connecting ...");
  int i = 0;
  while (wifiMulti.run() != WL_CONNECTED) { // Wait for the Wi-Fi to connect: scan for Wi-Fi networks, and connect to the strongest of the networks above
    delay(250);
    Serial.print('.');
  }
  Serial.println('\n');
  Serial.print("Connected to ");
  Serial.println(WiFi.SSID());               // Tell us what network we're connected to
  Serial.print("IP address:\t");
  Serial.println(WiFi.localIP());            // Send the IP address of the ESP8266 to the computer

  if (MDNS.begin("esp8266")) {              // Start the mDNS responder for esp8266.local
    Serial.println("mDNS responder started");
  } else {
    Serial.println("Error setting up MDNS responder!");
  }

  server.on("/", HTTP_GET, handleRoot);        // Call the 'handleRoot' function when a client requests URI "/"
  server.on("/login", HTTP_POST, handleLogin); // Call the 'handleLogin' function when a POST request is made to URI "/login"
  server.onNotFound(handleNotFound);           // When a client requests an unknown URI (i.e. something other than "/"), call function "handleNotFound"

  server.begin();                            // Actually start the server
  Serial.println("HTTP server started");
}

void loop(void){
  server.handleClient();                     // Listen for HTTP requests from clients
}

void handleRoot() {                          // When URI / is requested, send a web page with a button to toggle the LED
  server.send(200, "text/html", "<form action=\"/login\" method=\"POST\"><input type=\"text\" name=\"username\" placeholder=\"Username\"></br><input type=\"password\" name=\"password\" placeholder=\"Password\"></br><input type=\"submit\" value=\"Login\"></form><p>Try 'John Doe' and 'password123' ...</p>");
}

void handleLogin() {                         // If a POST request is made to URI /login
  if( ! server.hasArg("username") || ! server.hasArg("password")
      || server.arg("username") == NULL || server.arg("password") == NULL) { // If the POST request doesn't have username and password data
    server.send(400, "text/plain", "400: Invalid Request");         // The request is invalid, so send HTTP status 400
    return;
  }
  if(server.arg("username") == "John Doe" && server.arg("password") == "password123") { // If both the username and the password are correct
    server.send(200, "text/html", "<h1>Welcome, " + server.arg("username") + "!</h1><p>Login successful</p>");
  } else {                                                                              // Username and password don't match
    server.send(401, "text/plain", "401: Unauthorized");
  }
}

void handleNotFound(){
  server.send(404, "text/plain", "404: Not found"); // Send HTTP status 404 (Not Found) when there's no handler for the URI in the request
}
The HTML in handleRoot is:
<form action="/login" method="POST">
    <input type="text" name="username" placeholder="Username"></br>
    <input type="password" name="password" placeholder="Password"></br>
    <input type="submit" value="Login">
</form>
<p>
    Try 'John Doe' and 'password123' ...
</p>
Upload the sketch and go to http://esp8266.local/, then type 'John Doe' into the username field, and 'password123' into the password field, and click 'Login'. You should get a welcome screen. If you leave on or both of the fields blank, you should get a 400 (Bad Request) error. If you enter a wrong username or password, you should get a 401 (Unauthorized) error.
The data of the POST body can be accessed using
server.arg("key")
, and you can check if a specific key exists using
server.hasArg("key")
. The key name on the ESP8266 corresponds to the name argument in the HTML form on the web page.
When we get a POST request, we first check if the necessary arguments (username and password) are present. If that's not the case, we send a 400 (Invalid Request) status.
Then we check if the credentials match 'John Doe' & 'password123'. If that's the case, we respond with a status 200 (Ok) and a welcome page. If the username and/or password doesn't match, we send a 401 (Unauthorized) status.
Then we check if the credentials match 'John Doe' & 'password123'. If that's the case, we respond with a status 200 (Ok) and a welcome page. If the username and/or password doesn't match, we send a 401 (Unauthorized) status.
Inline functions
In the previous examples, we passed
handleRootand
handleNotFoundto the
server.onfunction as a parameter (callback function). In some cases however, it's more readable to just write the definition of the function inline, like so:
void setup(){
  // ...
  server.onNotFound([](){
    server.send(404, "text/plain", "404: Not found");
  });
}