ESP8266 Data logging
A common use for IoT devices like the ESP8266 is monitoring sensors. Using the code in the previous example, we can request the time, and save some sensor values to a file. If we run a server as well, we can show this data in a pretty graph in a webpage.
Temperature logger
In the following example, we'll use a DS18S20 temperature sensor to log the temperature over time and save it to the SPIFFS. It can then be displayed in a graph in the browser.
Installing libraries
First, download the Dallas Temperature library by Miles Burton and the OneWire library by Jim Studt: Go to Sketch > Include Library ... > Manage Libraries and search for 'Dallas Temperature' and 'OneWire' (make sure you download the correct version).
Hardware
Connect the ground of the DS18S20 temperature sensor (pin 1) to the ground of the ESP, connect the data pin (pin 2) to GPIO5, and VCC (pin 3) to the 3.3V of the ESP. Finally, connect a 4k7Ω resistor between the data pin and VCC.
Libraries, constants and globals
#include <OneWire.h>
#include <DallasTemperature.h>
#include <ESP8266WiFi.h>
#include <ESP8266WiFiMulti.h>
#include <WiFiUdp.h>
#include <ArduinoOTA.h>
#include <ESP8266WebServer.h>
#include <ESP8266mDNS.h>
#include <FS.h>

#define ONE_HOUR 3600000UL

#define TEMP_SENSOR_PIN 5

OneWire oneWire(TEMP_SENSOR_PIN);        // Set up a OneWire instance to communicate with OneWire devices

DallasTemperature tempSensors(&oneWire); // Create an instance of the temperature sensor class

ESP8266WebServer server = ESP8266WebServer(80);       // create a web server on port 80

File fsUploadFile;                                    // a File variable to temporarily store the received file

ESP8266WiFiMulti wifiMulti;    // Create an instance of the ESP8266WiFiMulti class, called 'wifiMulti'

const char *OTAName = "ESP8266";         // A name and a password for the OTA service
const char *OTAPassword = "esp8266";

const char* mdnsName = "esp8266";        // Domain name for the mDNS responder

WiFiUDP UDP;                   // Create an instance of the WiFiUDP class to send and receive UDP messages

IPAddress timeServerIP;        // The time.nist.gov NTP server's IP address
const char* ntpServerName = "time.nist.gov";

const int NTP_PACKET_SIZE = 48;          // NTP time stamp is in the first 48 bytes of the message

byte packetBuffer[ NTP_PACKET_SIZE];     // A buffer to hold incoming and outgoing packets
The only new things here are the OneWire and DallasTemperature libraries, to get the temperature from the sensor.
Setup
void setup() {
  Serial.begin(115200);        // Start the Serial communication to send messages to the computer
  delay(10);
  Serial.println("\r\n");

  tempSensors.setWaitForConversion(false); // Don't block the program while the temperature sensor is reading
  tempSensors.begin();                     // Start the temperature sensor

  if (tempSensors.getDeviceCount() == 0) {
    Serial.printf("No DS18x20 temperature sensor found on pin %d. Rebooting.\r\n", TEMP_SENSOR_PIN);
    Serial.flush();
    ESP.reset();
  }

  startWiFi();                 // Start a Wi-Fi access point, and try to connect to some given access points. Then wait for either an AP or STA connection

  startOTA();                  // Start the OTA service

  startSPIFFS();               // Start the SPIFFS and list all contents

  startMDNS();                 // Start the mDNS responder

  startServer();               // Start a HTTP server with a file read handler and an upload handler

  startUDP();                  // Start listening for UDP messages to port 123

  WiFi.hostByName(ntpServerName, timeServerIP); // Get the IP address of the NTP server
  Serial.print("Time server IP:\t");
  Serial.println(timeServerIP);

  sendNTPpacket(timeServerIP);
}
In the setup, there's not much new either, we just start the temperature sensor, and check if we can communicate with it. If no temperature sensor is found, the ESP resets.
Getting the temperature from the sensor may take some time (up to 750ms). We don't want our loop to take longer than a couple of milliseconds, so we can't wait 750ms. If we did, the HTTP server etc. would start to misbehave.
The solution is to request the temperature first. The sensor will then start reading the analog temperature, and stores it in its memory. In the meantime, the loop just keeps on running, the server refreshes etc. After 750ms, we contact the sensor again, and read the temperature from its memory.
To tell the library that we don't want to wait for the analog to digital conversion of the sensor, we use setWaitForConversion.
Loop
const unsigned long intervalNTP = ONE_HOUR; // Update the time every hour
unsigned long prevNTP = 0;
unsigned long lastNTPResponse = millis();

const unsigned long intervalTemp = 60000;   // Do a temperature measurement every minute
unsigned long prevTemp = 0;
bool tmpRequested = false;
const unsigned long DS_delay = 750;         // Reading the temperature from the DS18x20 can take up to 750ms

uint32_t timeUNIX = 0;                      // The most recent timestamp received from the time server

void loop() {
  unsigned long currentMillis = millis();

  if (currentMillis - prevNTP > intervalNTP) { // Request the time from the time server every hour
    prevNTP = currentMillis;
    sendNTPpacket(timeServerIP);
  }

  uint32_t time = getTime();                   // Check if the time server has responded, if so, get the UNIX time
  if (time) {
    timeUNIX = time;
    Serial.print("NTP response:\t");
    Serial.println(timeUNIX);
    lastNTPResponse = millis();
  } else if ((millis() - lastNTPResponse) > 24UL * ONE_HOUR) {
    Serial.println("More than 24 hours since last NTP response. Rebooting.");
    Serial.flush();
    ESP.reset();
  }

  if (timeUNIX != 0) {
    if (currentMillis - prevTemp > intervalTemp) {  // Every minute, request the temperature
      tempSensors.requestTemperatures(); // Request the temperature from the sensor (it takes some time to read it)
      tmpRequested = true;
      prevTemp = currentMillis;
      Serial.println("Temperature requested");
    }
    if (currentMillis - prevTemp > DS_delay && tmpRequested) { // 750 ms after requesting the temperature
      uint32_t actualTime = timeUNIX + (currentMillis - lastNTPResponse) / 1000;
      // The actual time is the last NTP time plus the time that has elapsed since the last NTP response
      tmpRequested = false;
      float temp = tempSensors.getTempCByIndex(0); // Get the temperature from the sensor
      temp = round(temp * 100.0) / 100.0; // round temperature to 2 digits

      Serial.printf("Appending temperature to file: %lu,", actualTime);
      Serial.println(temp);
      File tempLog = SPIFFS.open("/temp.csv", "a"); // Write the time and the temperature to the csv file
      tempLog.print(actualTime);
      tempLog.print(',');
      tempLog.println(temp);
      tempLog.close();
    }
  } else {                                    // If we didn't receive an NTP response yet, send another request
    sendNTPpacket(timeServerIP);
    delay(500);
  }

  server.handleClient();                      // run the server
  ArduinoOTA.handle();                        // listen for OTA events
}
The loop looks a lot more complex, but it's actually pretty simple. It's all based on Blink Without Delay.
There's two things going on:
- Every hour, the ESP requests the time from an NTP server. Then it constantly checks for a response, and updates the time if it gets an NTP response. If it hasn't received any responses for over 24 hours, there's something wrong, and the ESP resets itself.
- Every minute, the ESP requests the temperature from the DS18x20 sensor, and sets the 'tmpRequested' flag. The sensor will start the analog to digital conversion.
750ms after the request, when the conversion should be finished, the ESP reads the temperature from the sensor, and resets the flag (otherwise, it would keep on reading the same temperature over and over again). Then it writes the time and the temperature to a file in SPIFFS.
By saving it as a CSV file in the filesystem, we can easily download it to the client (using the web server that is running), and it's easy to parse with JavaScript.
If we miss the first NTP response, timeUNIX will be zero. If that's the case, we send another NTP request (otherwise, the next request would be an hour later, and the temperature logging only starts when the time is known).
We also need to run the server and OTA functions to handle HTTP and OTA requests.
Setup functions, server handlers and helper functions
These functions haven't change since the previous example, so there's no need to cover them here. You do need them to get the program running, though. Download the ZIP archive with examples for the full sketch.
HTML and JavaScript
There's some HTML and JavaScript files to plot the temperature using Google Graphs. I won't cover it here, but if you wan't to know how it works, you can find the files in the ZIP archive.
Using the example
Set the SPIFFS size to 64KB or larger if you plan to use it for prolonged periods of time. (You could also increase the logging interval on line 80 to save space.)
Enter your Wi-Fi credentials on lines 138-140, and hit upload. Then upload the webpages and scripts to SPIFFS using Tools > ESP8266 Sketch Data Upload.
Make sure you have the temperature sensor connected, as described at the top of this page. Open a terminal to see if it works. You should see something like this:
Connecting
..........

Connected to SSID
IP address:	192.168.1.2

OTA ready

SPIFFS started. Contents:
	FS File: /favicon-144x144.png, size: 2.81KB
	FS File: /temperatureGraph.js.gz, size: 1.17KB
	FS File: /temp.csv, size: 42.50KB
	FS File: /success.html.gz, size: 456B
	FS File: /edit.html.gz, size: 700B
	FS File: /main.css.gz, size: 349B
	FS File: /index.html.gz, size: 795B
	FS File: /manifest.json, size: 169B
	FS File: /favicon.ico.gz, size: 1.91KB

mDNS responder started: http://esp8266.local
HTTP server started.
Starting UDP
Local port:	123
Time server IP:	216.229.0.179
Sending NTP request
NTP response:	1488666586
Temperature requested
Appending temperature to file: 1488666627,20.00
Temperature requested
Appending temperature to file: 1488666687,19.94
Temperature requested
...
Let it run for a couple of minutes, to gather some temperature data. Then open a web browser, and go to http://esp8266.local/.
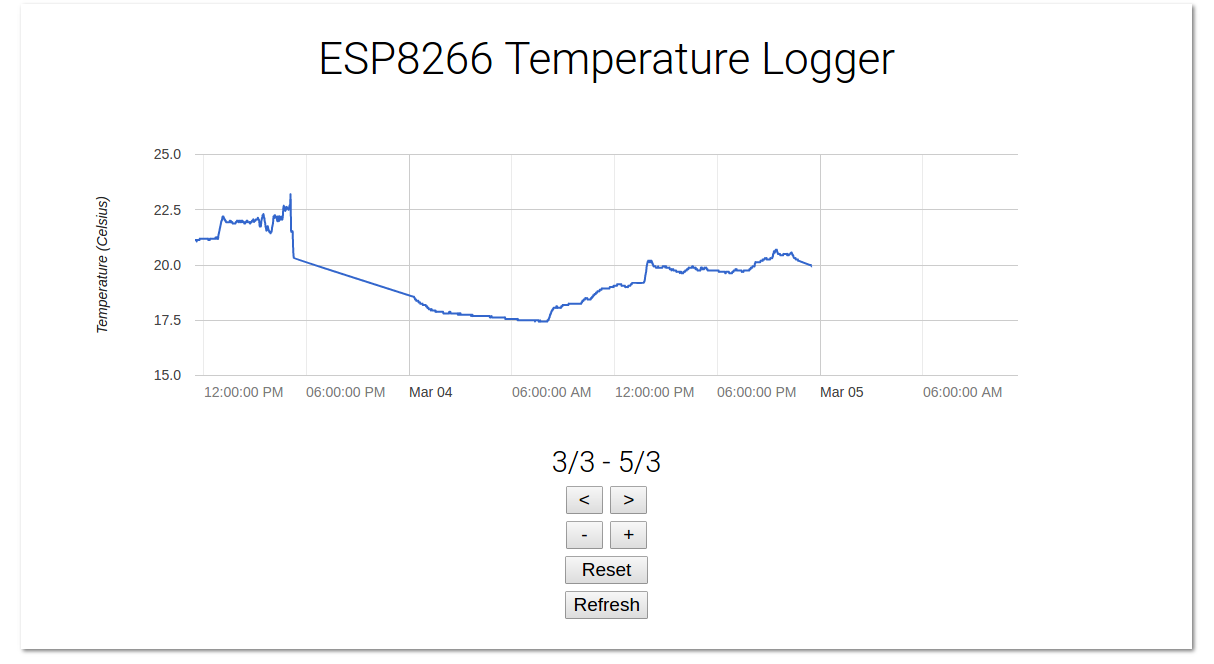
You should get a graph showing the temperature curve. You can use the arrow buttons to travel through time, and the + and - buttons to zoom in or out. The reset button resets the zoom, and jumps back to the present. Refresh requests the latest temperature data.
If you want, you can still go to http://esp8266.local/edit.html to upload new files.
The web interface should look like this:
It works on Windows, Linux and Android, but iOS seems to have some problems rendering the graph (in both Chrome and Safari).