Universal Garage Door Cloning Remote Control Key
| Product Details | Price Per Unit | Quantity | Order Total | Status | |
Did you received the item?
Also please find more detail of the items below:
77884:
Product description
Press to press remote control user manual
The press to press RC(remote control) can be used without copy master,it sends and receives signal & does copy by itself,mostly used in area of auto,electric-door,etc.It is fit for kinds of fixed code copy.And study IC style as belows:AX5326-3、PT2262、PT2260、EV1527、FP527、PT2242、HT600、HT680、HT6207、HT6010、HT6012、HT6014、AX5326-4、SMC918、PT2240、HT6013、HT6013、HT12D and so on;
Clear code:Press lock & unlock button at the same time,LED light will flash 1time after 2s(second),then loose unlock button only,and press it 3times(the action need be finish in 3s).Then when the light keep flash,the code cleared.
Copy:take the original RC by left hand,and our product by right,closer them as possible(back to back will be better).Press 2 lock button at the same time,after 3s,the light will flash 3times and keep flashing then.It showed the lock-button-copy action successful.Other buttons do the same process.
Revert:When you clear the RC code carelessly,press lock & mute button at the same time.After 3s,LED light flash 3times then keep flashing,it showed the code recovered.
Adjust frequency:If it is fixed frequency,press any button to have a test.If it is adjust frequency(on 315MHz,can be test directly),find your frequency by non inductive regulator on the chip board,range from 280--450MHz.Pls kindly note,for metal RC,pls lower 3MHz around to remove the influence caused by metal.For example,adjust 315MHz to 312MHz,and 433MHz to 431MHz on the chip,when you fixed on the metal RC shell,the frequency will increase litt
79121.02
Working voltage: DC12V(27A/12V battery x1, Included)
Output Voltage: AC and DC optional
Working frequency: 433MHz
Key: 4 Keys
Emission Distance: 20-50m (Open area)
Transmission rate: 50-60 KHz
The working temperature: -10°C to 50°C
Encoding type: Learning Code
Working chip: EV1527
Resistance: 330K
Case material: Metal
Size: 53*31*10mm
Uses: Family, shopping malls anti-theft alarm system, electric vehicles, automotive, motorcycle alarm, all kinds of door and window controller and other industrial control.
Hope these information may help you
Juliana
1, Clear out code:
To Clear up test stored rf signal memory from factory by pressing the locking key and unlock the key at the same time, two seconds later, LED indicator light flashes three times, followed by a continuous fast blinking. Indicates that the remote control codes stored has been cleared out.
2, Duplicating (learning)
Hands are holding remote control , and the other are holding the duplicating remote control, 2 remote controls put together as close as possible, while pressing the remote controls two match button,(eg: A-A’,B-B’) three seconds later, LED indicator light flashes three times, followed by a continuous fast blinking. This indicates that this copy of the remote control buttons are same as copied on the remote control button codes . Several other keys are also according to the above approach to learning.
3, Recovery code
If the code copied have been mistakenly removed the remote control, you do not worry, the remote control can restore yourself. Method is pressing (up-down eg: locking key and bell key) two buttons (metal shell remote control on the left, the plastic shell remote control on the right) at the same time ,3 seconds later, LED indicator light flashes three times, followed by a continuous fast blinking. This indicates that the original remote control codes have been restored.
Operating Instructions:
1. Clear
Please press lock key and unlock key at the same time, after 2s LED light flashing 3 times, then flashing fast while still keep pressing the two keys, it indicates clearing successfully.
Note: if the LED didn’t flash, please checked the batteries installation; if the batteries are installed in the right way, please return to the manufacturers for maintenance.
2. Duplicating
With left hand handling the original remote control, right hand handling the duplicating remote control, keeping the two as close as possible, at the same time pressing the lock button of the two controllers, after 3s LED light flashing 3 times, then flashing fast, it shows that the original control of the lock key code has been copied into the duplicating remote control. The other three buttons are operated in the same way for duplication.
3. Resume
If you clear any codes of duplicating remote controller incautiously, you can press start key and mute key simultaneously, after 3s LED light flashing 3 times, and then flashing fast it shows the code of duplicating remote control is resumed.
Some tips for clearing and duplicating:
In the process of duplicating, when one of the key codes couldn’t be successfully duplicated while others function normally, you can try this way: first conduct clearing operation, duplicate the key code again for the one fail to be duplicated just now, conduct clearing operation again and then resume the key code of this button.
Note:
1) It is necessary to clear its present codes of duplicating remote controller before conducting duplicating operation.
How to test whether its present codes have been cleared successfully:
After clearing operation, press one of the four button, if LED light flash after about 2 seconds, it indicate key codes are cleared successfully; if LED light flash immediately when you press any button, it indicated there still exist key code; please repeated clear operation.
2) This kind ofRF remote controlcan only duplicate fixed code instead of scroll code.
MoreRF wireless remote controllersfor your option:
How to Use RF Wireless Remote Control Universal Controller Keychain
 Recently a great deal of mini RF wireless universal remote controllers is released. They are designed with keychain, convenient to take with you anywhere. Here I will take 4 Buttons 315MHz RF Wireless Remote Controller Keychain STH-23301 as an example to tell you how to use these kinds of RF remote controllers, since most are applied in the similar way.
This remote controller has a high speed recording. It covers application ranging from simple domestic remote control to autonomous control. Cheap with just about $3.99 and extremely easy to set up. With the press of a button, the device can turn on, turn off, adjust its own volume and perform any number of device-specific tasks. Besides, it is designed to control a wide variety of electronic devices with a wireless signal for garage doors, electric gate, automatic barrier remote control, burglar alarm field and etc.
Product Specification
- Working voltage: DC 12V
- Operating current: 16mA
- Operating frequency: 315MHz
- Encode type: Learning code
- Encode mode: EV1527
- Transmitting distance: 180 meter
- Net weight: 29.5g
- Color: as shown in the picture
- Size: 52 x 28 x 12mm
Display of Button Function
Operating Instructions:
1. Clear
Please press lock key and unlock key at the same time, after 2s LED light flashing 3 times, then flashing fast while still keep pressing the two keys, it indicates clearing successfully.
Note: if the LED didn’t flash, please checked the batteries installation; if the batteries are installed in the right way, please return to the manufacturers for maintenance.
2. Duplicating
With left hand handling the original remote control, right hand handling the duplicating remote control, keeping the two as close as possible, at the same time pressing the lock button of the two controllers, after 3s LED light flashing 3 times, then flashing fast, it shows that the original control of the lock key code has been copied into the duplicating remote control. The other three buttons are operated in the same way for duplication.
3. Resume
If you clear any codes of duplicating remote controller incautiously, you can press start key and mute key simultaneously, after 3s LED light flashing 3 times, and then flashing fast it shows the code of duplicating remote control is resumed.
Some tips for clearing and duplicating:
In the process of duplicating, when one of the key codes couldn’t be successfully duplicated while others function normally, you can try this way: first conduct clearing operation, duplicate the key code again for the one fail to be duplicated just now, conduct clearing operation again and then resume the key code of this button.
Note:
1) It is necessary to clear its present codes of duplicating remote controller before conducting duplicating operation.
How to test whether its present codes have been cleared successfully:
After clearing operation, press one of the four button, if LED light flash after about 2 seconds, it indicate key codes are cleared successfully; if LED light flash immediately when you press any button, it indicated there still exist key code; please repeated clear operation.
2) This kind of RF remote control can only duplicate fixed code instead of scroll code.
More RF wireless remote controllers for your option:
Create a DLL by CSharp or VB.Net for VBA
Creating a DLL in C# or VB.Net is not that hard as long as you have object oriented programming experience or knowledge. After creating the DLL, I tried to reference it from Access VBA editor but kept getting the message "Can't add a reference to the specified file.". After some research on this issue, I learned some new tricks about (1) how to correctly create a DLL for Access or Excel (or any Microsoft Office applications or VB6 applications), (2) how to correctly register a C# or VB.Net DLL, and (3) how to correctly reference the DLL within Access VBA or Excel VBA.
In this article, I'm going to show you how to correctly create a C# or VB.Net DLL in Visual Studio and use it inside MS Access, Excel VBA, or VB6 applications. Hope the tips can save you a couple of hours or days of headaches.
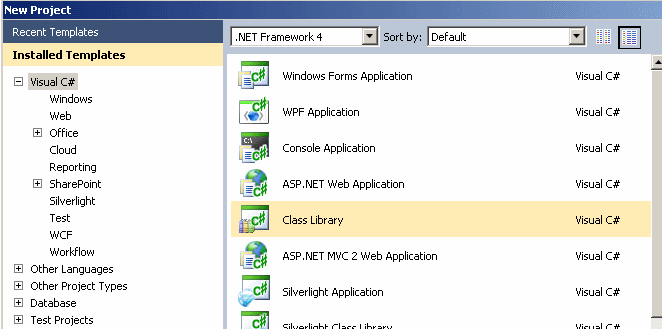
1. Create a new C# (or VB.Net) project and select Class Library as the template type.
Save the project (and solution) as SimpleCalc.
Below I created a simple calculation class for testing. This class has two variable members and one Add() method. The method adds two integer numbers and returns the result.
using System;
using System.Collections.Generic;
using System.Linq;
using System.Text;

namespace SimpleCalc
{
    public class Calc
    {
        private int numberOne = 0;
        private int numberTwo = 0;

        public void SetNumberOne(int number)
        {
            numberOne = number;
        }

        public void SetNumberTwo(int number)
        {
            numberTwo = number;
        }

        // Add two integers
        public int Add()
        {
            return numberOne + numberTwo;
        }
    }
}
2. Configure project properties to make it COM visible.
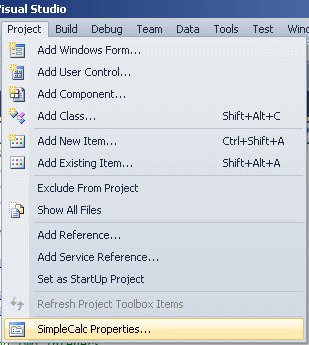
Open project properties dialogue window. Go to menu Project -> SimpleCalc Properties.
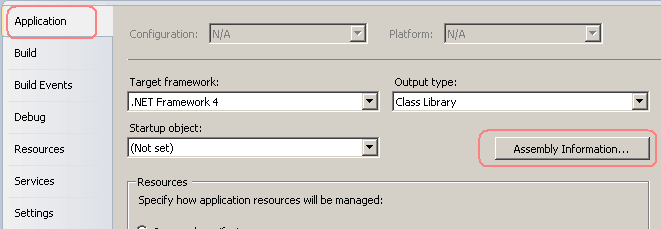
When the project properties window is opened, click Application tab, and then click Assembly Information button.
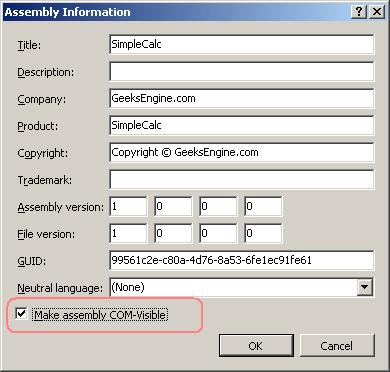
On the Assembly Information window, check Make assembly COM-Visible.
Applications created in VB or VBA are COM-based applications. So the class library you created in C# or VB.Net must be created as a COM visible assembly. This allows COM-based applications to call the class library's member variables and methods.
3. Register for COM Interop.
In addition to making the DLL COM-visible, we also need to register the assembly as a COM component in the Windows registry. There are a few ways to do it based on your circumstances.
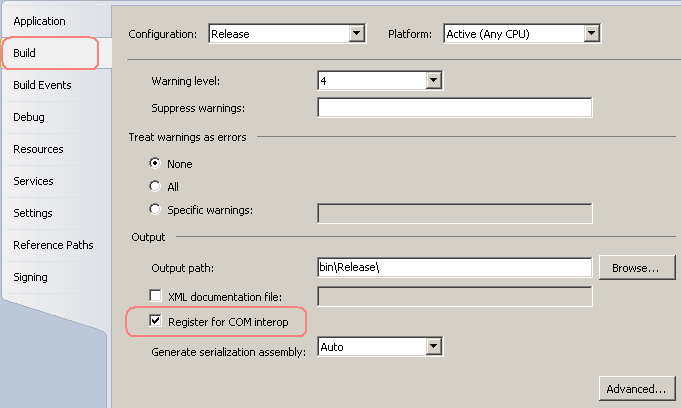
For a development machine, we can check "Register for COM Interop" setting in Visual Studio. On the project properties window, click Build tab. Then check Register for COM Interop (Based on your version of Visual Studio, it could be on a different tab). This makes Visual Studio do two things automatically when the project is compiled. First, it will generate a .tlb type library file. Second, it will register class information for the COM component in Windows registry.
The Register for COM interop property specifies whether your application will expose a COM object to client applications so that they can interact with your COM object transparently.
Here is what is registered in Windows registry for the compiled assembly so that COM clients can use the .NET class transparently. Note that the path to the DLL is stored in CodeBase entry.

To register the assembly on other computers such as production machines, you can register the assembly by using RegAsm.exe. See this article for details.
4. Compile the project.
Build the solution. Then go to bin folder. Depends on whether your build is a Debug or Release build, you can find the DLL and .tlb type library file in either Debug or Release folder under the bin directory.
In our case, it's D:\CSharp\SimpleCalc\SimpleCalc\bin\Release

5. Copy the type library file to Windows system folder.
Windows system folder C:\WINNT\system32 is the default location for DLLs and type libraries so we copy type library SimpleCalc.tlb to it.
6. Reference the type library from Access VBA editor.
First, create a new Access database and open Visual Basic code editor. In the menu cross the top, click Tools -> References...

When the References window is opened, click the button Browse.
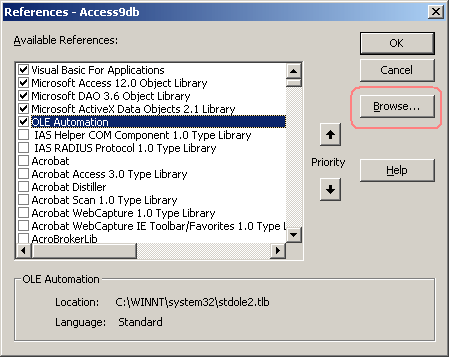
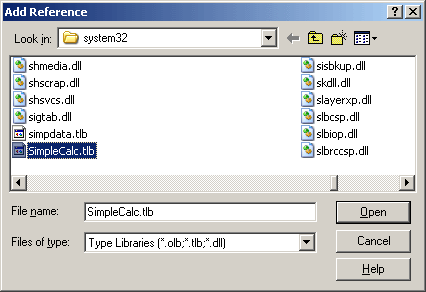
Then browse to folder C:\WINNT\system32 and select file SimpleCalc.tlb and click Open.
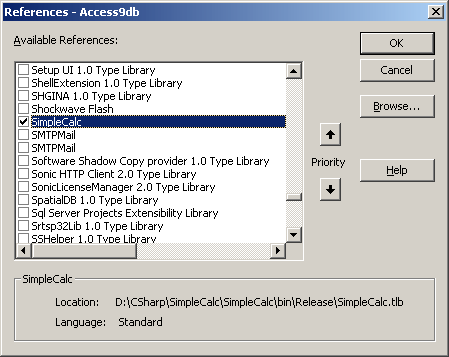
After done, SimpleCalc will appear in your reference list and you need to move down in the list to find and check it. Then click OK to close the Reference window.
You may remember in the registry screenshot above, there is a DLL path value in CodeBase entry. VBA will use this registry information to find which DLL to call. In our case, it's D:\CSharp\SimpleCalc\SimpleCalc\bin\Release\SimpleCalc.dll
7. Use the DLL in your VBA code.
To use the variables and methods in the C# DLL, we need to call the DLL inside VBA. Add a button to the Access form and then add a click event to it. In the click event we call a function called test() which is created within a VBA module.

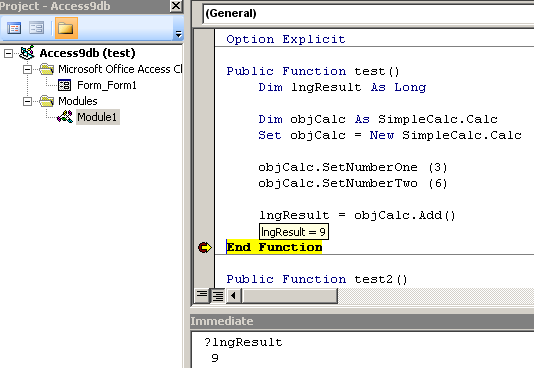
Below is a sample VBA to call SimpleCalc.dll. test() function invokes the .Net DLL by creating a new object from Calc class and then call its methods.
Public Function test()
    Dim lngResult As Long

    Dim objCalc As SimpleCalc.Calc
    Set objCalc = New SimpleCalc.Calc

    objCalc.SetNumberOne (3)
    objCalc.SetNumberTwo (6)

    lngResult = objCalc.Add()

End Function
If we debug and step through the test function, we will see the result is 9 as it's calculated inside the C# DLL and returned to VBA. You can see the result value either in Immediate window or by moving mouse over the lngResult variable.
In this article, we have gone through the steps to create a .Net C# DLL and then use it inside Access VBA. It brings the power of .Net into Microsoft Office applications. The limitation in this article is that Visual Studio registered our DLL and type library automatically for our development machine only. We haven't covered how to deploy the DLL to a production machine. In this case, check out this article about how to use Regasm.exe (Assembly Registration Tool) to register DLL on a target machine or production computer. Note that you can also create a setup package for your application and add regasm.exe as a custom command to the installer package.
Happy Coding!
ESP-01 connection with Arduino UNO
I have just been working on a project involving Arduino (Nano) and an ESP.
A few notes from my experience:
* The ESP-01 has a bit delicate pinouts. I had multiple times when I had thought there is something wrong with the module and it was all OK after I pressed the pinouts with my fingers (on the soldered side).
* I highly recommend to reset the module with the reset pin (connect it to one of the Arduino's pins, set the pin to LOW and then HIGH again).
* You can definitely use UNO with it with the following adaptations:
A - Connect ESP TX pin to UNO directly
B - Connect ESP RX pin to UNO with a voltage splitter (using 3 identical resistors)
C - Use SoftwareSerial and define the appropriate pins as RX/TX. Do note that using SoftwareSerial limits the bit rate one can use. I recommend using 9600bps.
D - Don't forget to define the module's working bitrate to 9600bps too. The right AT command changes from FW to FW, try using AT+BAUD or AT+CIOBAUD
E - Connect the Vcc pin to the UNO's 3v3 pin. You can connect it to an external power supply, just make sure the ground is shared between the module, UNO and power supply.
* In order for you to be able to debug this properly I would suggest the following setups:
A - Communicating with the module via FTDI to usb converter
B - Communicating with the module via Arduino with a simple sketch that only transfer the commands from UNO's serial to the ESP software serial (and back)
C - Using your own sketch
This way, whenever there is a problem you can easily figure out whether it's a hardware or software problem.
For any additional help feel free to send me a message.
http://nicuflorica.blogspot.ro/2015/03/modulul-de-retea-uairles-esp8266-05-si.html


